Welcome to Tablein
Setting up restaurant settings
Adding reservations to the system
Integrating reservation widget
1. The beggining
Restaurant set up
%202025-01-22%20at%209.37.20%20AM.png?width=2044&height=2398&name=Tablein%20Demo%20restaurant%20(Main%20street)%202025-01-22%20at%209.37.20%20AM.png)
Restaurant profile
Please access your restaurant profile and fill in the contact information section. This is essential for automated email and SMS notifications, widget notifications, website, integrations.
Restaurant profile and contacts
Select your time zone and language
Open the time and language settings to select your system language and primary widget language, which will also be applied to notifications, reservation policies, and related features. Additionally, choose either a 24-hour or 12-hour time format in the restaurant profile to align with your preferences.
Create uses (optional)
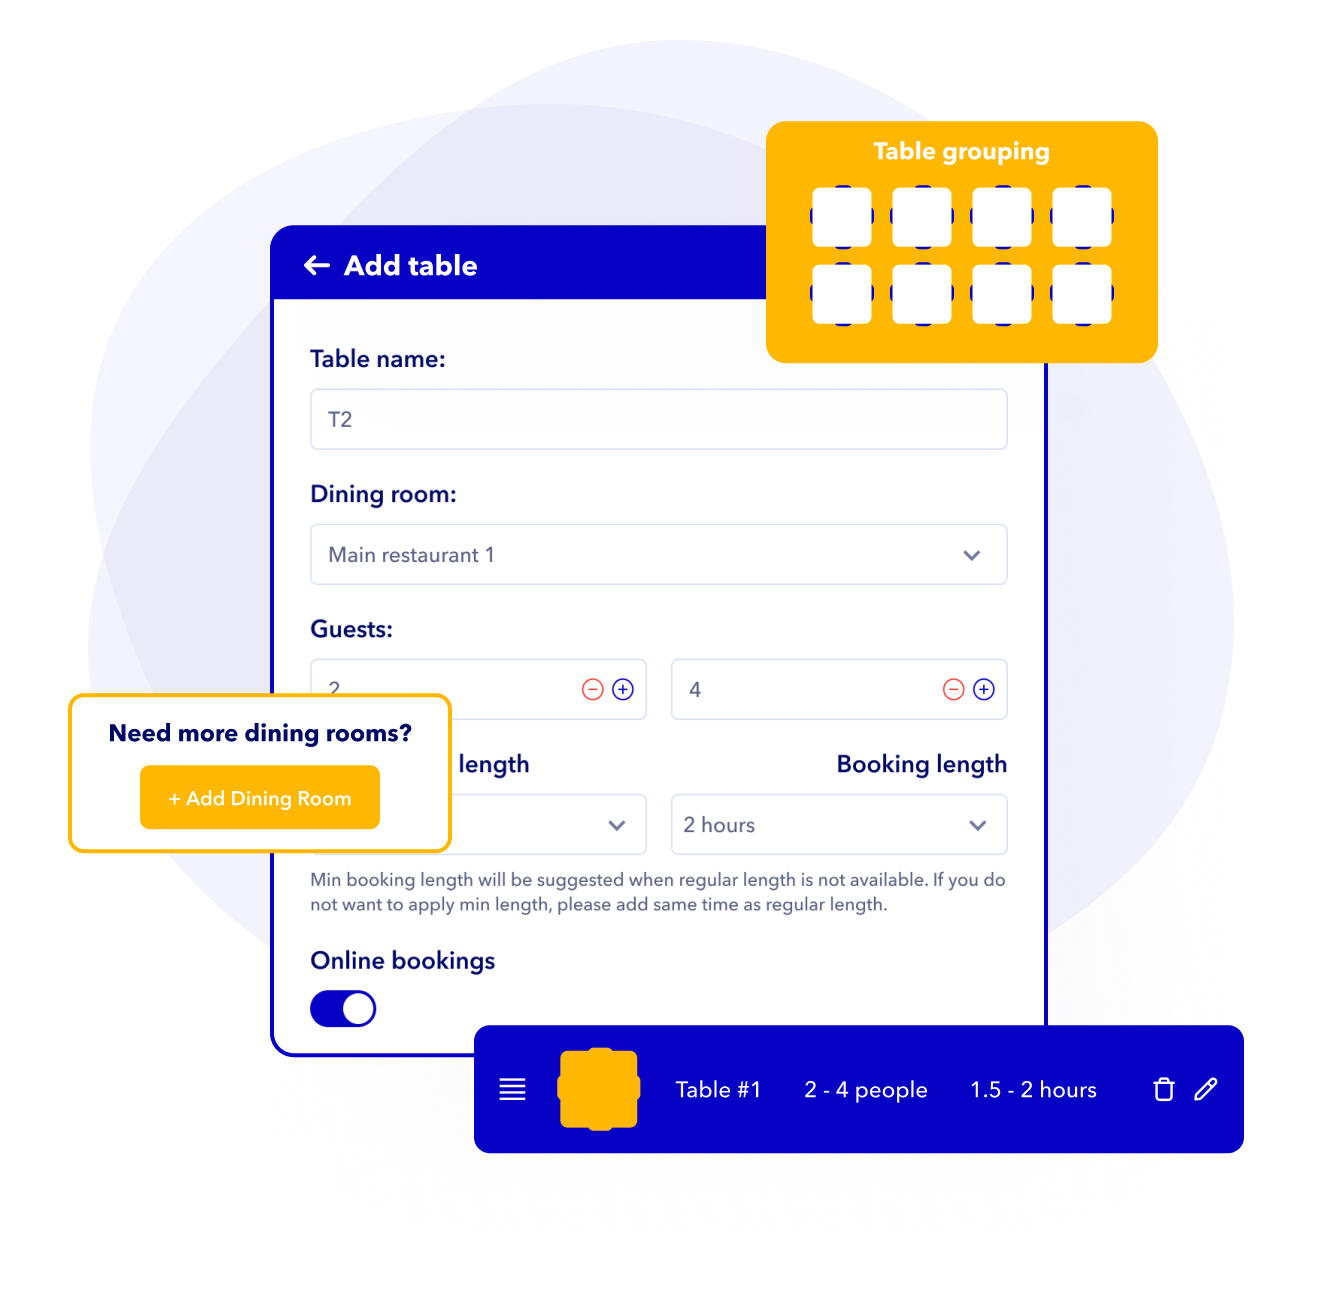
Dining areas and tables
Having multiple dining areas allows you to manage their availability independently. You can choose whether to enable online bookings for each area, giving guests the option to select their preferred seating.
Create dining areas and tables
Open the Dining Rooms and Tables settings and click "Edit" (note that the floor plan feature will be available soon). Add multiple dining rooms and tables, assigning tables to each area based on their size (number of people). Specify whether each dining area or table can be booked online. Don’t forget to save your changes. For further guidance, refer to our help page.
Merge tables for group reservations (optional)
Table groups let you combine tables to fit larger parties. If a suitable table isn’t available, the system will automatically group tables for online reservations. Check our help page to learn how to set up and use table groups.
Reservation duration
The system automatically adjusts reservation durations based on the group size, with larger groups receiving longer durations and smaller groups or lunchtime reservations having shorter durations. The default booking length will be used as the primary setting. For minimum turnover for phone reservations, we recommend selecting the shortest available value, such as 15 or 30minutes, to allow flexibility for short reservations or quick blocks.The minimum turnover for online reservations can match the default or be set separately; if the default time is unavailable, the widget can suggest shorter durations with a warning. Learn more about durations on our help page.


Opening hours and availability
Opening hours and online availability can be customized for each dining area. Keep in mind that the last available reservation times are determined by the table booking length. For example, if you want the last reservation to be at 9 p.m. and your booking length is 2 hours, set the closing time to 11 p.m.
Reservation time slots
At the top of the Opening Hours page, select whether bookings should be available every 15 or 30 minutes. For example, you can choose time slots like 18:00, 18:15, 18:45, 19:00 for 15-minute intervals or 18:00, 18:30, 19:00 for 30-minute intervals.
Set up regular opening hours
Set up your weekly opening hours by marking your available times. If you're closed for dinner or want to block bookings for specific areas or times, simply click to mark those slots in red. For step-by-step instructions, watch the video tutorial.
Custom periods (Optional)
Calendar and list settings
Ensure to add all current reservations before enabling online bookings to prevent overbookings. Avoid using duplicate or fake phone numbers for different guests. For online reservations, providing a phone number is always mandatory. If unsure of a guest's phone number for other types of bookings, consider disabling the phone number requirement.
Settings
These settings let you choose whether to use auto-arrival status or manually update reservations only after the guest arrives. You can also enable a statistics banner displaying the total number of guests and reservations, and decide whether to view the full day (from opening to closing) with all reservations or use a scroll view for larger cards. For detailed information with images and explanations, please follow this guidance.
Calendar and list button explained
Floor plan (optional)
The floor plan allows you to view your restaurant's layout and see booked tables for a specific time. You can also add reservations directly by selecting tables on the plan. Please note that the floor plan is currently being updated, and a new version will be introduced soon.
%202025-01-22%20at%2010.22.45%20AM.png?width=2336&height=2392&name=Tablein%20Demo%20restaurant%20(Main%20street)%202025-01-22%20at%2010.22.45%20AM.png)
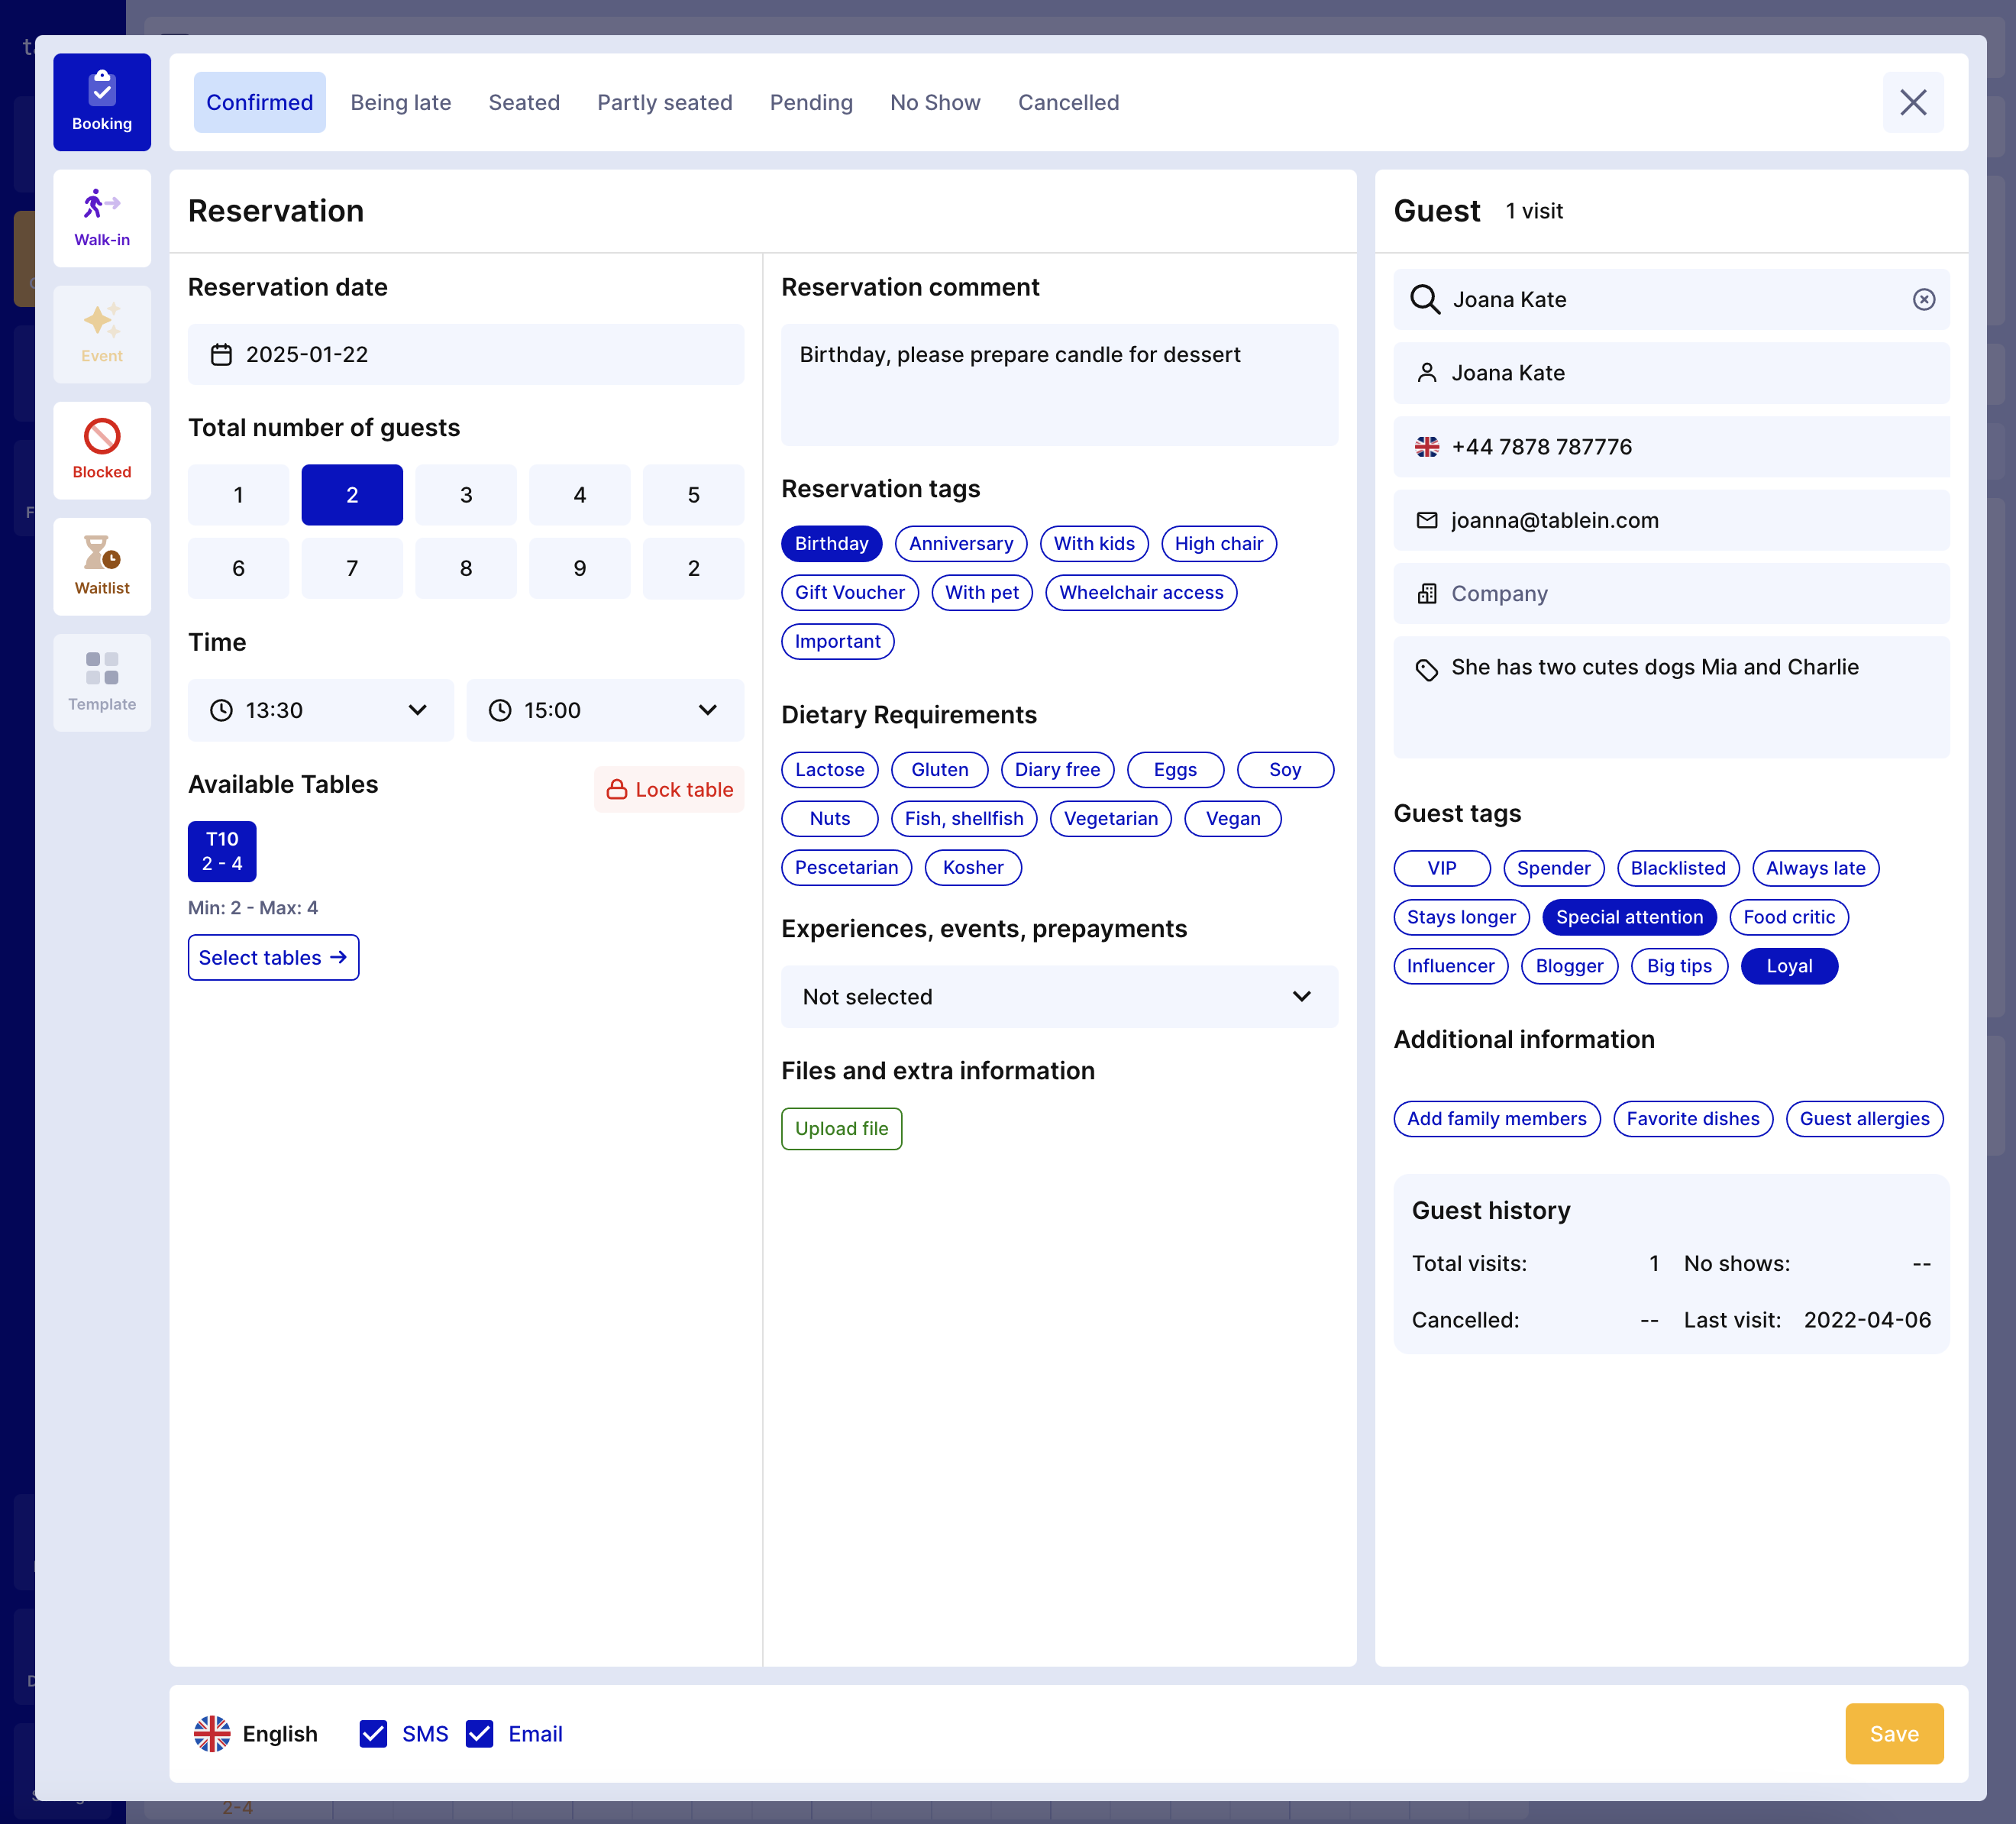
Reservation modal
Reservation statuses and types
Reservation details
Details include the number of guests, date, and time. Staff can add comments, apply special tags for occasions or dietary restrictions, select prepayment options, and view the received date. The system logs reservation and date changes and supports language selection for notifications.
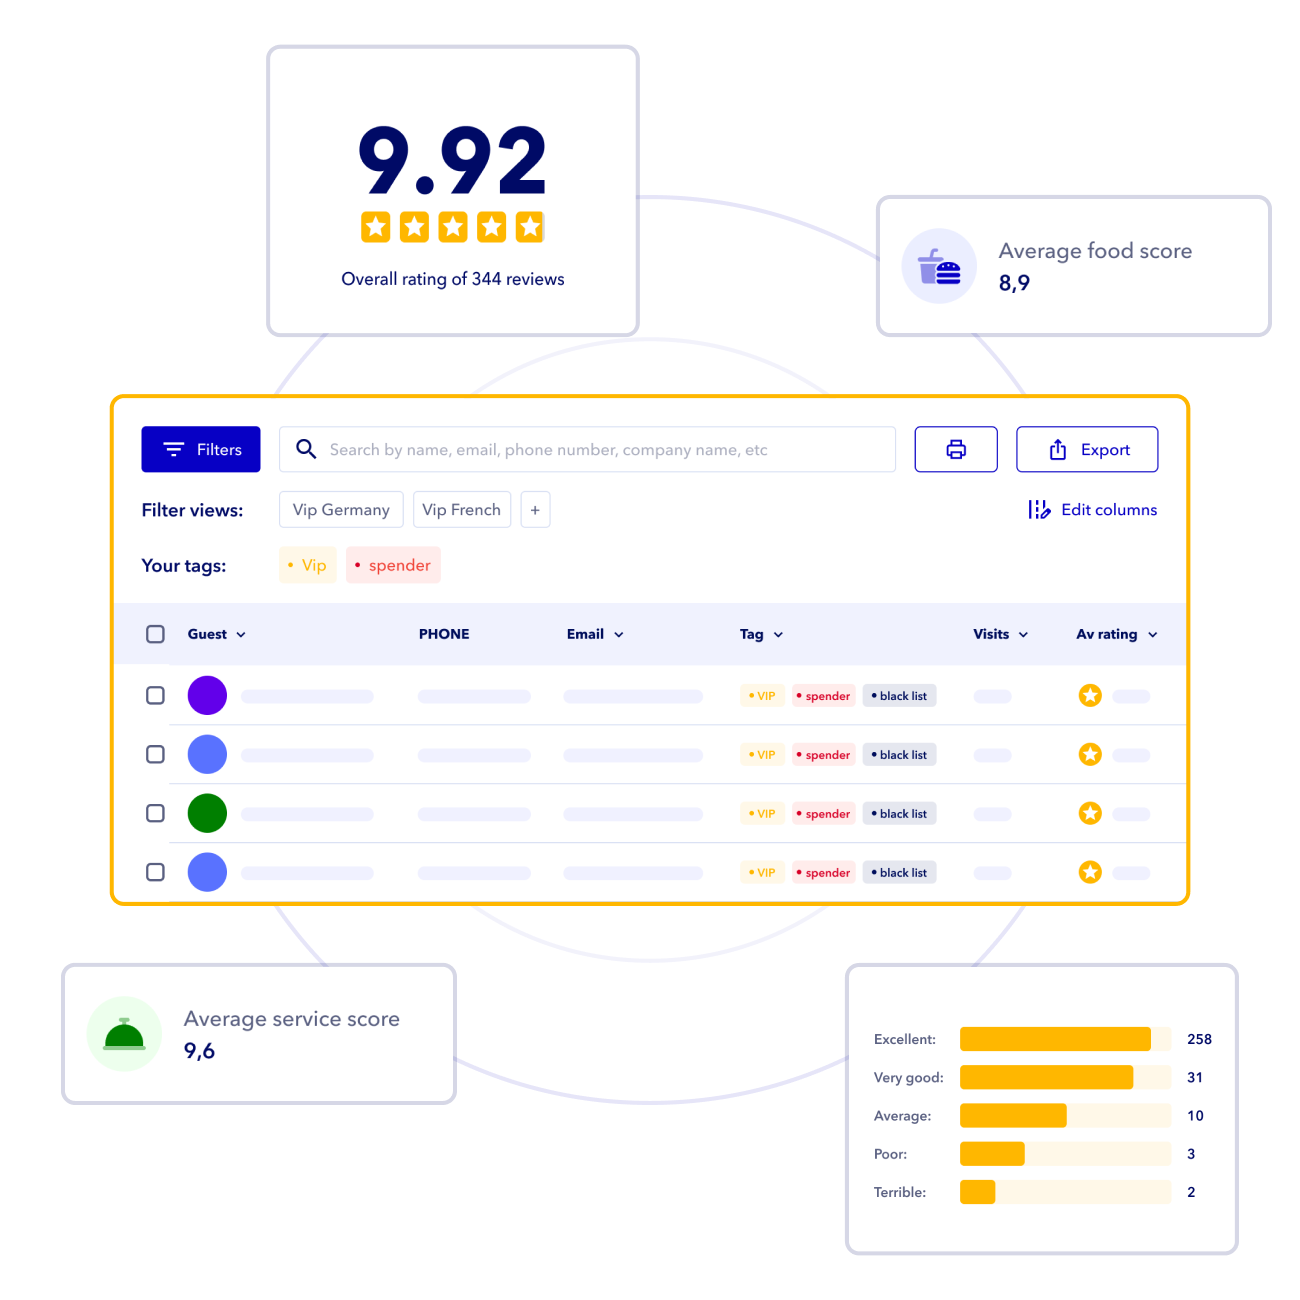
Guest details
The system saves all guests by phone number and retains their name, email address, company name, guest notes, tags (e.g., VIP), visit history, and feedback score.
Widget settings
Widget settings let you manage online booking availability, choose widget languages, enable dining room selection, set maximum booking limits, and apply other restrictions as needed.
Widget settings
In widget settings, choose automatic reservation confirmation (recommended) or manual approval. Set the maximum number of guests allowed to book online and other limits, such as how many days in advance or minutes before the reservation time bookings are accepted. You can also set limits per time slot or day for online bookings; these limits don’t apply to phone reservations. Learn more about widget settings here.
Widget fields
The Widget Fields feature allows you to enable or disable specific fields to gather important information about your guests and their preferences. Examples of fields include options for dietary requirements, food intolerances, allergies, special occasions, highchair requests, and more. These settings help personalize the guest experience and improve overall service quality. For a detailed explanation of all available fields and how to customize them, visit our Widget Fields Settings Guide.
Booking policy
The Booking Policy feature helps you clearly communicate important rules and guidelines to your guests. Key fields include policies for late arrivals, children, pets, wheelchair access, and reservation cancellations. Optional fields, like dress codes, group reservations, and service fees, can also be included to tailor your policy further.To set up or update your booking policy, log in to admin.tablein.com and navigate to the Policies and Terms section. Once configured, your policy will appear in the widget in the selected language. For a detailed guide, visit our Booking Policy Settings Guide.
%20%202025-04-28%20at%2010.27.26%20AM.png?width=1874&height=2340&name=Restaurant%20Tablein%20Demo%20restaurant%20(Main%20street)%20%202025-04-28%20at%2010.27.26%20AM.png)
%20%202025-04-28%20at%2010.26.44%20AM.png?width=1858&height=2330&name=Restaurant%20Tablein%20Demo%20restaurant%20(Main%20street)%20%202025-04-28%20at%2010.26.44%20AM.png)
Widget integration
Easily integrate the online reservation widget into your website and social media platforms, centralizing reservations from all channels in one place. The option to use different widgets for multiple channels helps you track where each reservation originates.
Reserve with Google
To activate the Google Reserve button, add your phone number and location address in the third-party integration. Your Google button will appear in your profile and on Google Maps within one day. If you encounter any issues, please contact us at support@tablein.com.
Widget integration to website
The widget is HTML-based, allowing you to set it up on your website in seconds by copying and pasting a simple HTML code. The widget is fully responsive, so choose the correct size to ensure all information is visible. For custom widget button colors to match your brand, contact us at support@tablein.com, and we’ll make the adjustments for you. More widget themes and forms are coming soon. For detailed integration instructions, visit our Widget Integration Guide.
Facebook and Instagram integration
To enable the Reserve button on Facebook and Instagram, both accounts must be connected, and the restaurant must have both platforms. As this integration is managed through a partner system, please contact us at support@tablein.com for credentials and further instructions.
Deposits and No-show fee
Securing reservations is vital to reducing no-shows and last-minute cancellations. To take deposits or save card details, a third-party integration is required, with all payments going directly to your account. Our tools allow you to handle deposits or card details for various situations, such as weekend events, peak times, festive days, or special events, tailored to different offers or dining areas.
No show / late cancellation fee
Deposits and prepayments
This feature is available with Stripe, PayPal, Redsys and Paysera payment methods. Learn how to set up deposit fees for online reservations, request fees for phone reservations, and configure the settings fields by visiting our detailed guide.
Deposit for group reservations only
The system allows taking deposits only for group reservations or during weekend evenings. For group reservations, navigate to Prepayment and event settings, and specify the Minimum guests. Additionally, for specific days, select the days and times at the bottom of the settings when you want to take deposits or save card details.

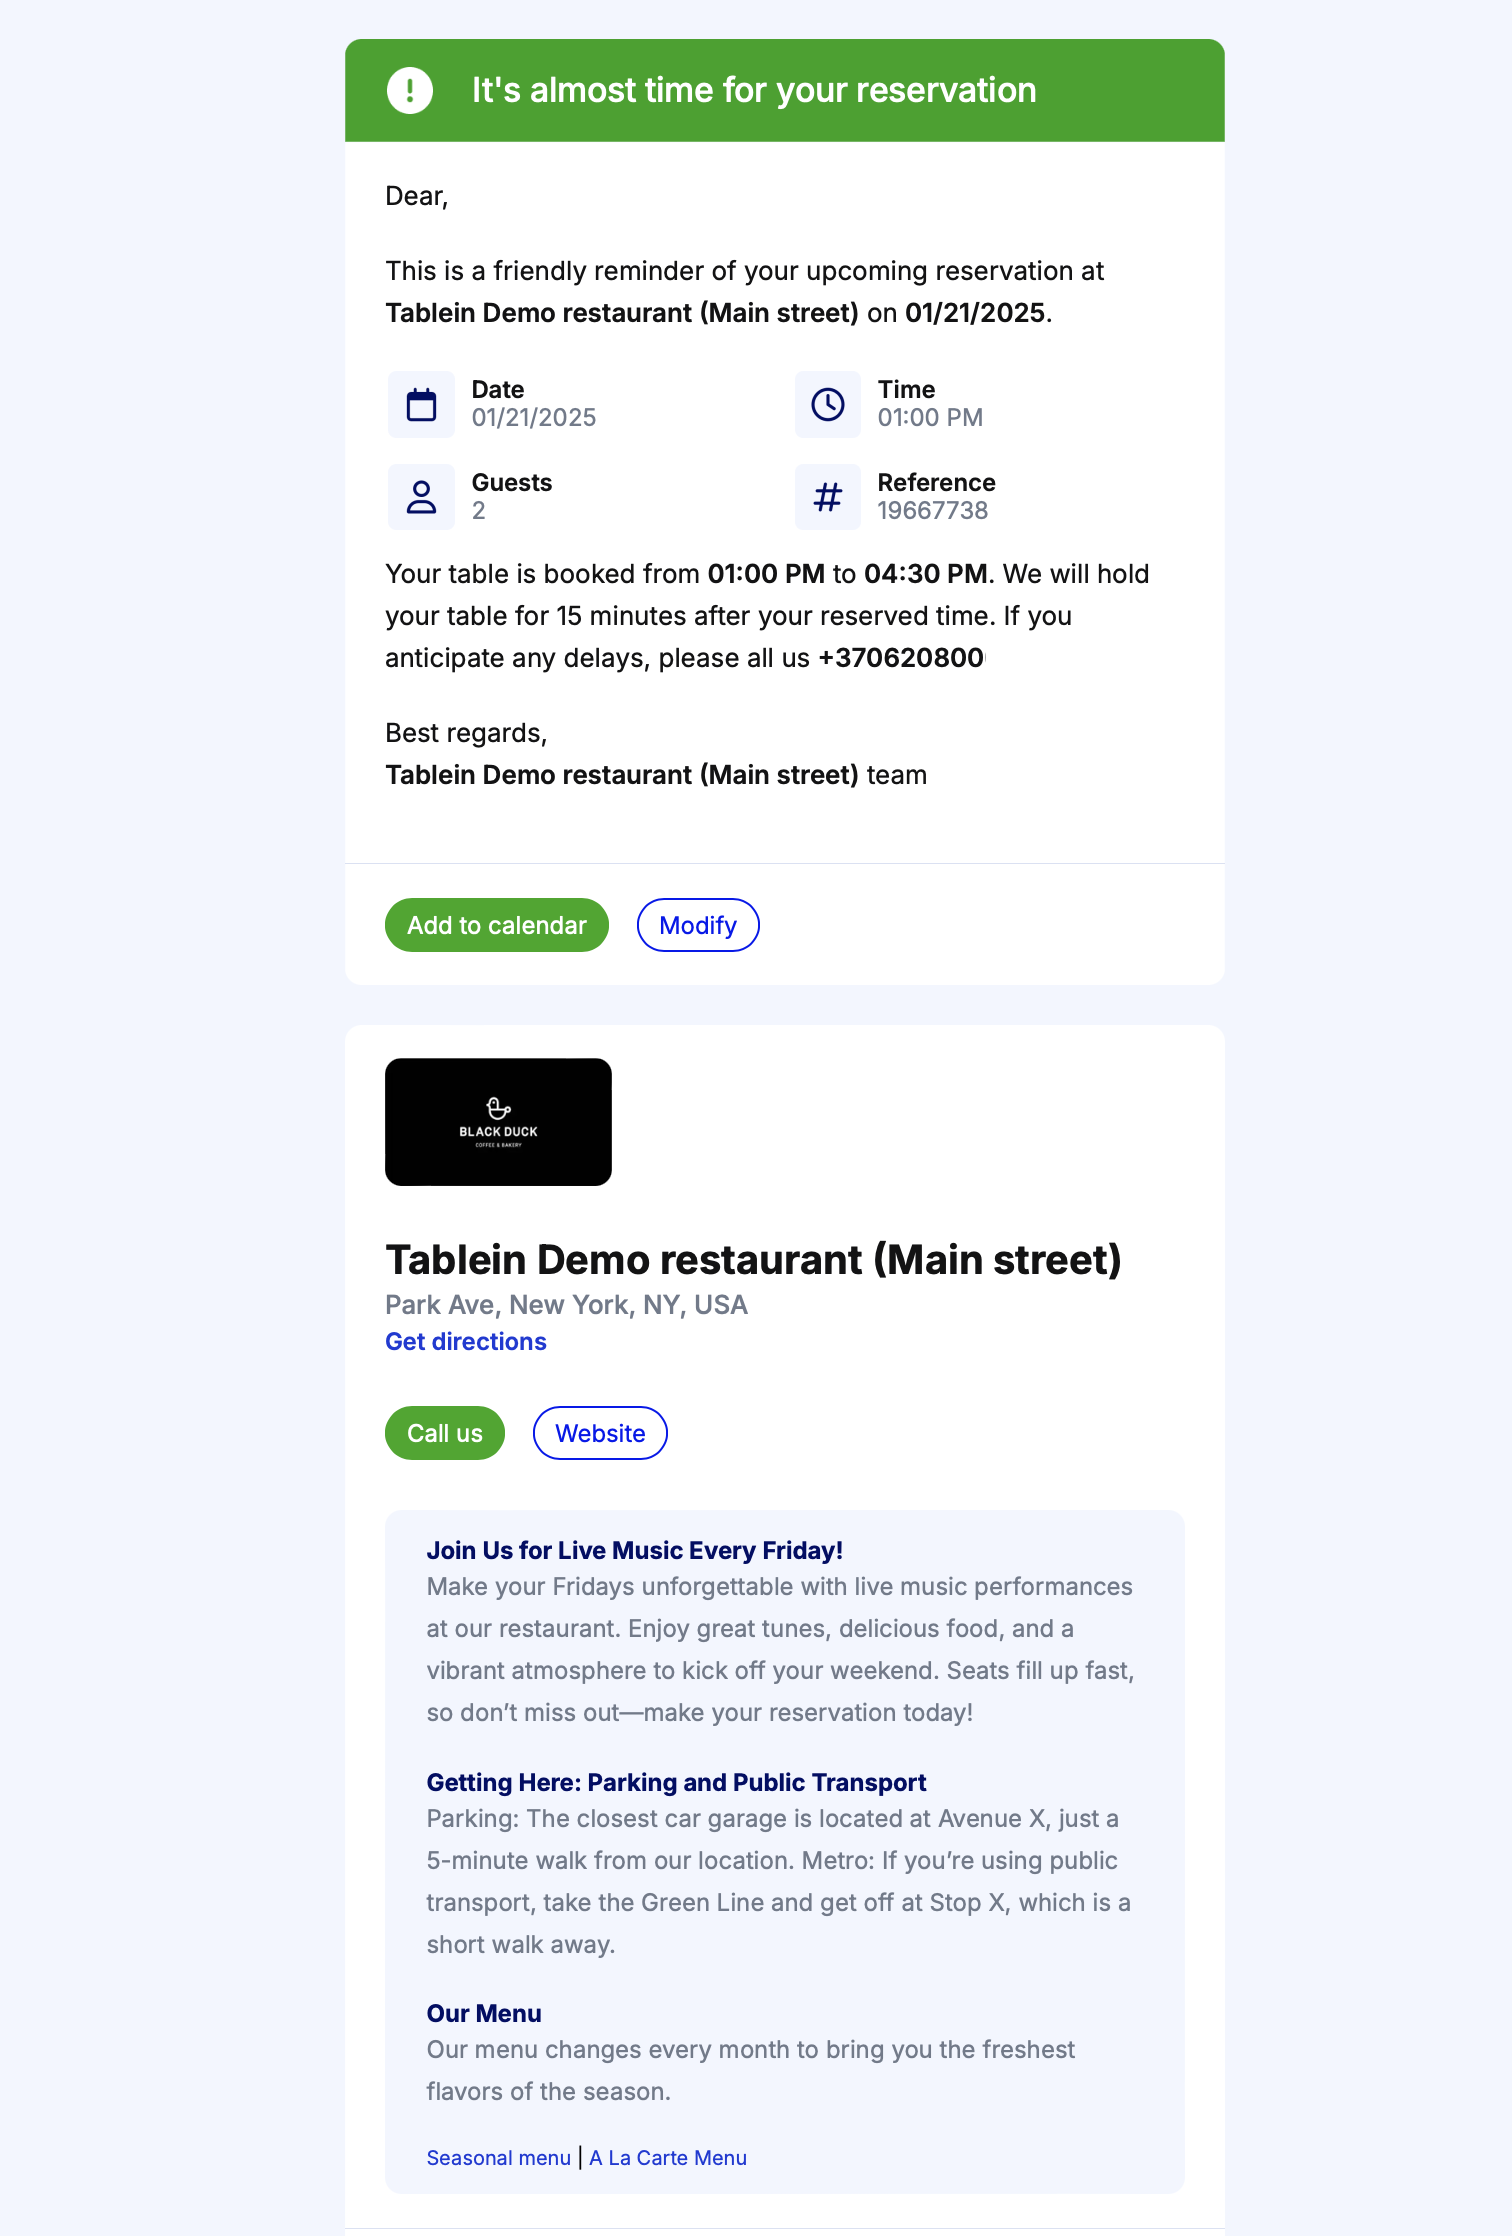
SMS and email notications
After a guest makes a reservation, we send a series of notifications via email and optional SMS, including confirmation, reminder, feedback, and pending emails. All these notifications can be customized to fit your preferences.
Email notifications
In email settings, choose whether to receive emails for new reservations, modifications, cancellations, or feedback. Specify who should receive these notifications by adding multiple email addresses separated by commas. You can also decide if reservations can be modified or canceled online or only by phone and easily customize email templates for a personalized touch. Learn more about emails.
SMS notifications
Email links and additional information
With the high open rate of reservation-related notifications, you can use this opportunity to promote upcoming events, offers, or other important information. You can customize this content by notification language in the email settings. For more details, refer to our guide.
Account settings
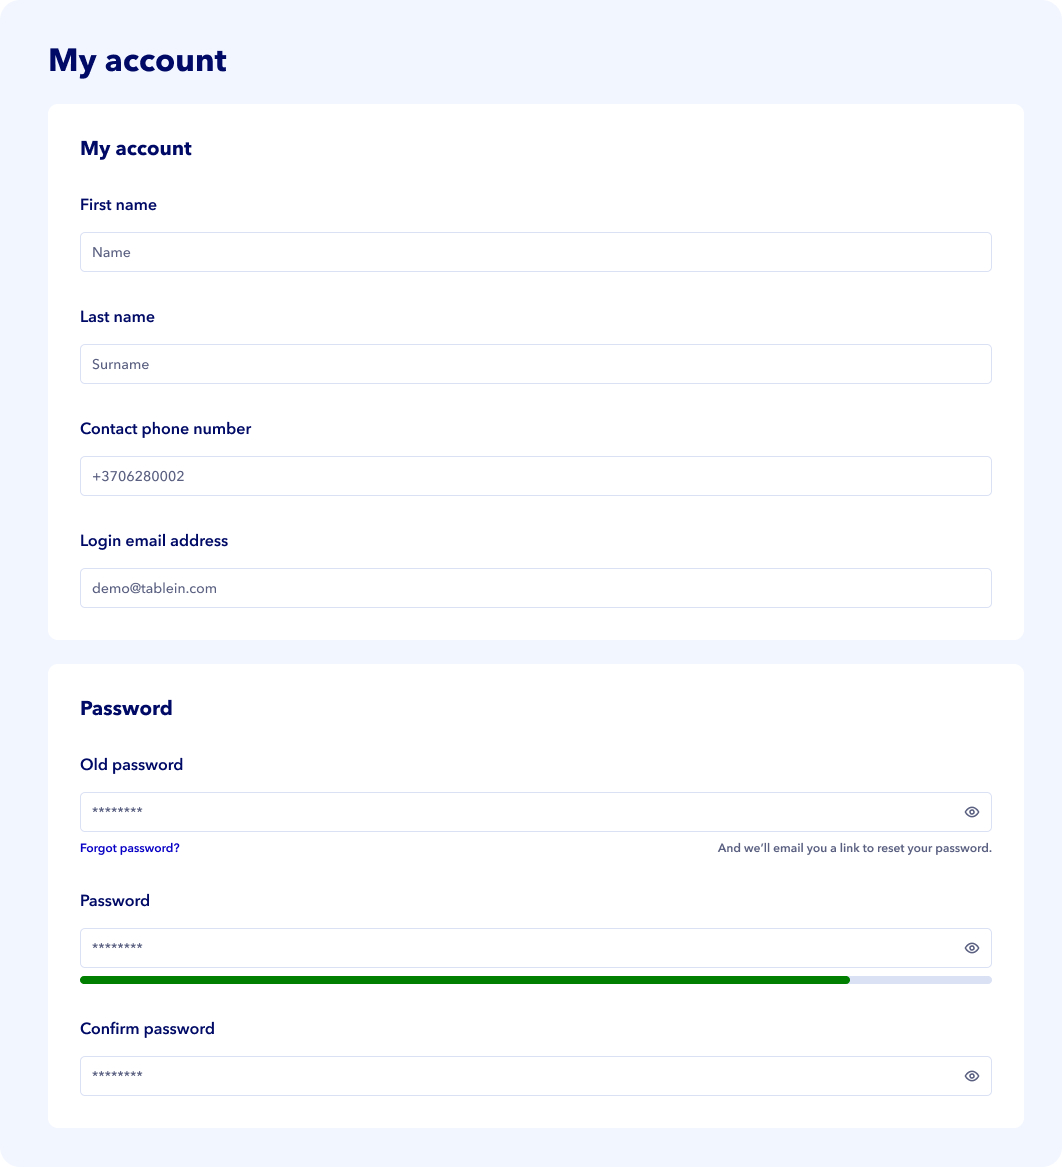
After completing the setup, make sure to update your password and enable 2FA authentication for enhanced security.
Update password
To update your password and enable 2FA authentication, navigate to your owner account. Please also provide your contact details in case we need to reach you—this information is private and will not be publicly visible. As the main user, you have default access to all settings. For other users, create separate accounts with appropriate access levels.
2FA authentification
2FA provides an extra layer of security by verifying your identity during login. We offer two options: SMS and email. You can enable 2FA in your owner account.
Change main user
Onboarding is finished!
We are here to help you achieve the best!
All reservations are added
Online widget is integrated
Marketing is set up!
Thank you for choosing Tablein system! We appreciate your support and hope you find our system beneficial for your business.
Reservation management: settings and tools for better productivity
Tablein management, floor plan, unlimited dining areas
Flexible time management settings for each dining area
Automatic table grouping option for increased capacity
Unlimited team accounts, permissions and staff notes
Quick and easy reservation search, edit, print, or export
Guest CRM and reports
Guestbook with reports, smart filters and export function
All-day booking activity view
Customisable reservation reports, filters, exports
Feedback report and feature to reply to comment
Report dashboard with detailed information
Tablein blog
Resmio vs Tablein - 1:1 Comparison

6 Examples of Restaurants That Nailed Their Branding

Best Competitors to Tock for Streamlining Your Restaurant Bookings

5 Restaurant Branding Mistakes You Should Avoid

Top Alternatives to easyTable: A Comparison for Restaurant Owners
